Thursday, July 30, 2015

Thoughtful Thinking Thursday ~16~ There was a Crooked Man

@ Mountain View, MO

               This house made me think of a rhyme from my childhood.
There was a crooked man, and he walked a crooked mile.
He found a crooked sixpence upon a crooked stile.
He bought a crooked cat, which caught a crooked mouse,
And they all lived together in a little crooked house.
 I'm thinking this house is harder to build than one would imagine?
Did I make you think?
*****************

Thanks to the FREE program

 Photoscape for downsizing & watermarking photo & other alterations to pictures.


Fri Foto- Photogenic Goat

@ Springfield, MO Zoo


 I think ducks and goats are the most comical animals, 
but goats are a bit more photogenic with their expressions.


***************************
  PhotoScape used to resize & watermark shots
I've been using this software in place of Photoshop for several years.

Wednesday, July 29, 2015

Wordless Wednesday #132 ~ Make Hay While the Sunshines

              Near Midway, KY

          We hear that saying a lot around here. It means to take any opportunity and make the most of it.  However, this has had realistic meaning for farmers this past spring & beginning summer for farmers around Kentucky as we have experienced a LOT of rain this year.

Thanks to:
Photoscape for downsizing & watermarking photos

***********************
Please see my "Linky Parties" link above for some
hard working hosts and more fabulous WW shots. 

Tuesday, July 28, 2015

My Lady's Nest: Sewing Room- 2011 to Present 2015

                A man has a man cave. I'm a lady with a lady loft?

            Do you like to see your progress over time?  I do just to make sure I AM making progress.  So here is a review of my sewing environment starting with my sewing room before I moved.
http://joysjotsshots.blogspot.com/2011/07/sewing-room-reveal.html
         Oh I loved that large cutting table even if I couldn't get around to the other side. Also notice my ironing station was not level with my sewing machine. I also had my "school office" in this room, so it was a minimum amount of space.

http://joysjotsshots.blogspot.com/2012/02/after-hurricane-christmas-2011-sewing.html
               I never really liked this arrangement.  I think I was sad and really doubting myself for cutting down my large sewing table.  I lost so much space.  Even though I'm not sharing my room with an office, it seems I lost a lot of space.
               Also, I was not happy with the lighting even though I had a large window.  In the late afternoons the sun shines directly into the room which is too much light.

http://joysjotsshots.blogspot.com/2013/07/the-sewing-room-room-of-joy.html
           Once I moved the cutting table away from the wall, I was a happier, however NOW I know we cut the size of the table too small because with the rearrangement of the cabinets, I need about an inch and half on each side.  To this day, it's staying the same way and I will be satisfied unless I come across a surface at a yard sale of second hand store that has a super price and will work better than this surface.
           I feel so blessed every time I go to this room to have all the library cabinets for storage.

http://joysjotsshots.blogspot.com/2014/08/what-only-6-inches-can-do-in-sewing-room.html
                The sewing room today hasn't changed from last year.  I really like my setup now except my dream would be to have my machine sunken to have a level working surface for quilting projects which would be more ergonomically correct for my posture and help with my arthritis.  
               I feel so blessed everyday to have this work space.

*********
Thanks to the FREE program
 Photoscape for downsizing & watermarking photo & other alterations to pictures.


Monday, July 27, 2015

Is It an Inspiration Board or Memory Board?

               While cleaning up the "junk" room, I found a piece of one inch thick styrofoam.  For some reason an Inspiration board popped into my head, AND I actually still had wall space. I also had inherited a bunch of hat pins from my Momma's & Mother's sewing stuff.  I covered the styrofoam with a knit fabric.  The board is so lightweight, it is actually stuck to the wall by several of the hat pins.  I don't intend to hang anything heavy.  That goes on the rack on the right.
               I had intentions of putting up pictures & directions for future projects.
                    However, the first thing I needed to put up while working on a quilt square was a reference sheet for making half square triangles.  At that point, I wondered if this was actually going to be a "Memory Board" for all those little details I had to keep looking up?

                       I can view this "Memory Board" from across my cutting board, & these printouts are actually large enough for me to read them from across the room.

                       Do you have an Inspiration/Memory Board?

& & & &

Thanks to the FREE program

 Photoscape for downsizing & watermarking photo & other alterations to pictures.


Sunday, July 26, 2015

Sunday Best ~ Roaring Fork Motor Trail Church

@ Smokies outside Gatlinburg, TN
If you can't walk trails, this car ride is perfect. 
 Lots of stops on the way to see old buildings that are being maintained, while trying to keep their originality.
Also, several stops to view flowing creeks that are fast or slow flowing depending on rains.
There is a large picnic area that is well shaded just before the trail starts. So pack a picnic.
***************************
  PhotoScape used to resize & watermark shots
I've been using this software in place of Photoshop for several years.

Saturday, July 25, 2015

Quilt Shot Block #36 ~ Crumb Strips

12½ inch block
          My fascination with crumbs continue.  Remember that pile of what I really call crumbs that was leftover from the last block?  
  Yep, used a bunch of them in this block. I had seen the idea of using adding machine tape to paper piece strips. However, I wanted my strips to be different widths to use smaller pieces. So I winged it without the paper then trimmed edges so I could sew the strips together.  The block grew until I could trim out a 12½ inch block.  
   It is odd that I had bought at a yard sale about 4 rolls of adding machine tape for about 25¢ each with no real purpose in mind.
Now I AM getting down mostly to a pile of threads that will have to go inside a pillow!

I was inspired to start all this crumbing piece from 
Crazy Mom Quilts Week 4 of her Scrap Vortex

Previous Crumb Blocks Posted
(Click on block)

http://joysjotsshots.blogspot.com/2015/07/quilt-shot-block-34-crumb-block.html

http://joysjotsshots.blogspot.com/2015/07/quilt-shot-block-35-4-patch-crumb.html


**********


Thanks to the FREE program:


Photoscape for downsizing & watermarking photo

Friday, July 24, 2015

Fri Foto- Barn Charm ~ Barn Quilt Trail


 Frankfort Road
There is a Barn Quilt Trail in our County.
**********************
Drive by shots with Nikon D5300 & Tamron lens

***************************
  PhotoScape used to resize & watermark shots
I've been using this software in place of Photoshop for several years.


Thursday, July 23, 2015

Thoughtful Thinking Thursday ~15~ A Tree with Lips

@ Athens, GA Arboretum 
 ~Kissy Kiss~
Did I make you think?

*****************


Thanks to the FREE program

 Photoscape for downsizing & watermarking photo & other alterations to pictures.

Wednesday, July 22, 2015

Wordless Wednesday #131 ~ My Favorite Flower is Red

@ Ryan's Mother's
Geranium

Thanks to:
Photoscape for downsizing & watermarking photos

***********************
Please see my "Linky Parties" link above for some
hard working hosts and more fabulous WW shots. 

Tuesday, July 21, 2015

Back Deck ~ Summer 2015


                 I had gotten the red water fountain for my Mother's front porch.  After she passed, I brought it back to my place.  Little did I realize it was going to match the cushions.
                 Can you see the other water feature sitting back in the corner?  Got that at a yard sale last year.  The bottom was rusted out, so I set it in a larger container and immersed the bottom.  Then added a pump.
               This wrought iron lawn chair set I bought at Goodwill 4 years ago was sitting on the creek bank.  I got rid of the high upkeep bamboo set and set this suite on the deck.  I know it needs painting, but I still like the shabby chic look. 
Can you see the daily visitor?  
He was either mad, protecting family or flirting, because there was a lot of chattering and switching that tail.

Monday, July 20, 2015

Mug Organizer

      While taking a peak at other sewing studios via video on You-Tube, a hostess mentioned a mug organizer that someone gave her.  After researching a bit, I found that Simplicity Patterns actually has a pattern.  However, it is a curved pattern and uses bias binding.  I stay away from bias binding if at all possible.
       Of course being me, I thought there must be an easier way to make one of these.  I think these could make nice Christmas gifts for anyone with a desk.  


****************************

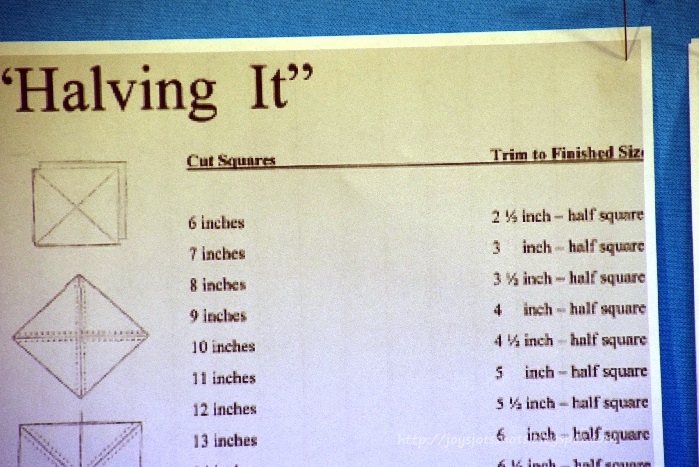
 Ex: My mug measured 4 inches tall with a circumference (around) 10½ inches. I suggest don't worry about small fractions except adding seams.
So I cut:  
      *inside/outside pieces rounded 10½ =11 x 4x2+½=8½ inches (yes pic shows it short, oops). 
      *inside pockets 11+2=13 x 8½-2= 6½ inches  
      *outside pockets  13+4=17 x 6½+½= 7 inches 
It has been determine, an "outside pockets" unit can replace the "inside pockets" unit.
Measurements revised 12/10/2015
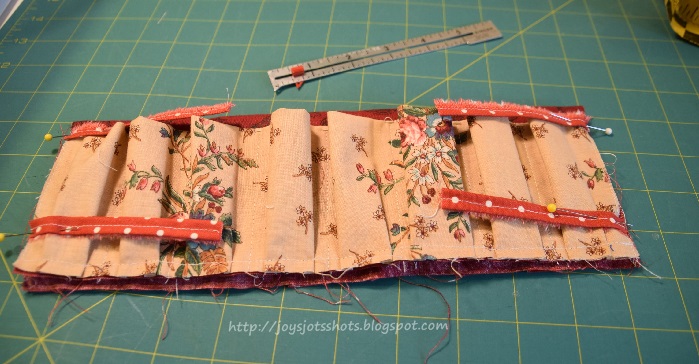
        To evenly divide the pocket section to match outside piece,  fold outside pocket piece in half hotdog style first, then fold it and the outside piece in half & press, then again & press and then again.  The pieces will be creased into 8 sections.  You might want to chalk the line if the creases won't stay.
 With raw edges meeting, match the crease lines and pin.
  Pin the edges together.

Either make tucks or pleat the extra fabric in between pins & press.


            Stitch around raw edge of pocket.  At this time, I stitched on all edges, so as to hold fabric stable for future stitching.
Take inside pocket piece, fold in half hotdog style, then in eighths like the outside pocket was done.
Inside pockets provide more shallow pockets because of space inside mug.  
So only a slight tuck needs to be pinned.  
I slide my fingers from each pin to pull in the extra fabric.
Again, stitch around all raw edges of inside pocket piece.
Next, matching crease lines, stitch along all creases.
Stitch each crease line starting at raw edge & ending about 1/8 inch from fold 
with a zig-zag stitch set at 5.0 width and 0 length.


To make the ties you could use ribbon or fabric.
          Make the ties whatever way suits you, but make them very narrow.  My piece of fabric is one inch wide so I fold in about 3/8 in. then folded over the soft selvage edge 3/8 over that.  I let the fabric speak to me and it wanted the soft selvage to be seen.
 Cut into 4 equal pieces.
Measure distance from top of mug to top of handle
&
from the bottom of the mug to bottom of the handle.

Pin ties in place.
 Remember to fold in half so you'll know how far down to pin the ties from the top edge.

 THEN the next step is where we do away with bias binding!

 Lay the piece flat.
Pin the facing right sides together.
              Turn over and stitch on the side where you can see the stitching so you can be sure to stitch inside the previous stitching. I place double pins to remind me where to stop and start to leave an opening for turning the piece inside out.
               My multi-purpose foot gives a generous 1/4 when I travel along the edge of my foot. Notice the stitching will be inside the previous stitching.
               Turn right side out, fold in opening to equal the seam, then top stitch all around to close in the opening which will be inside the cup and won't be seen anyway.  I used my Edge stitching or Joining foot with my needle in left position to help my top stitching be a bit more accurate.
Wa La! No bias binding needed!
No pattern needed!
I also didn't use batting which I felt would take up more space inside the cup.
I decided to tie under the handle in both places to help stabilize more & be out of the way.
The inside pockets were plenty big,
and the outside pockets certainly add more storage space.
I think I'll make more for my other storage mugs.
& maybe some for gifts?

********************************
 Updates & Tips for the Mug Organizer including Standard Measurements
Found HERE 

More Mug Organizers
Update 8-11-20: Now make a Coffee Can Organizer 
**************************************************
Sharing at several Linky Parties.

Thanks to the FREE program

 Photoscape for downsizing & watermarking photo & other alterations to pictures.