
I decided to make some for Christmas gifts, because I love how you don't have purse strings, but if you need hands free you can use the bow to dangle the clutch on your wrist.
Also, I wanted the clutch large enough for an electronic pad, or even a book for those that still use books. Then when you don't need to carry those items, it can be a smaller purse by folding it.


*****************
Here is my version of The Clutch Purse
including how I inserted the zipper.
*******************
Cut 2 pieces each of outer & lining fabric to size you desire.
Your electronic pad might determine this?
Don't do as I do, do as I say- Also cut interfacing if fabric isn't stiff.
However, I wanted to be able to fold, so I would not use a stiff interfacing.
My cutting board is marked in inches.

Depending on your dimensions for cutting the pieces above,
Cut 2 pieces of fabric for bow slightly wider,
but tall enough to go to what will be fold line on purse.
Sew the 2 pieces right sides together along long edges.
Center of bow is 1½ inches X 3 inches, folded right sides together,
stitched long edge, turned, whip stitch ends together turning under raw edges,
slide on bow hiding the seam in the back. Tack stitch to bow so it won't slip.
(or cut and make bow however you like. A tube of fabric, with the seam in back, would also do.)


Inserting Zipper
I used a zipper smaller than the width of the clutch.
To cover the ends, but a strip of fabric about as wide as zipper.
Place & pin as shown below.


Unzip zipper about an inch.
You'll see why later.


Start stitching where edge of fabric of clutch meets zipper tab.

Now you are about to see why you need to unzip the zipper.
Notice how the puller distorts the straight sewing line?
I am not using a zipper foot, but rather my normal foot.
I use the left of my foot to following on of the rows of designed stitches to help me sew straight.
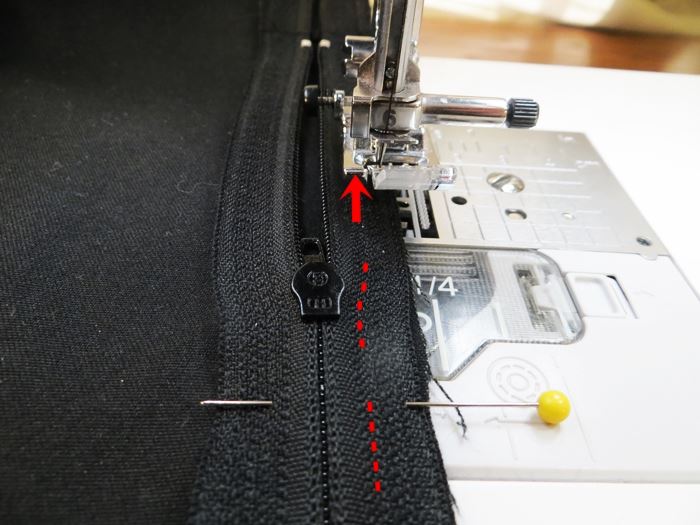
Stop with needle down.
Raise the presser foot.
Zip the puller behind the foot.
Lower presser foot and continue.


To stitch, turn over so you can see the former stitching and stitch along stitch line or just inside.


Sewing Clutch Together
Stitch the lining first.
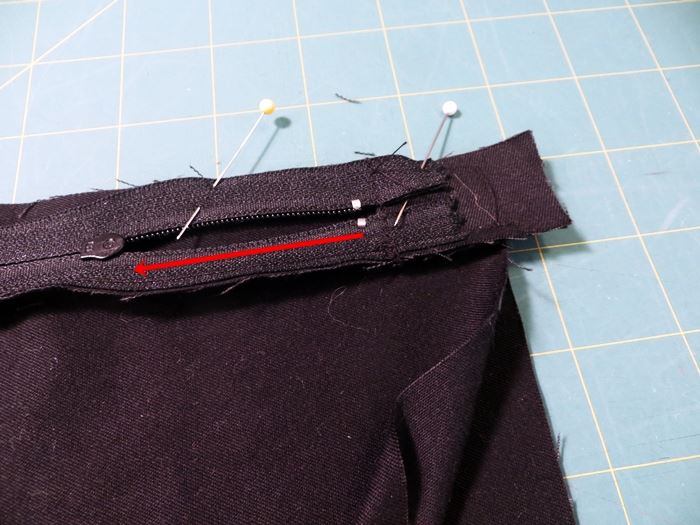
Fold in half the zipper and tab as shown below.

Start stitching just below the edge of the zipper.
DO NOT sew the tab together.
About 1/4 inch will not be stitched as shown below.
I started with a zero length zig zag stitch.


Oops, I didn't stop stitching soon enough. Arrows show where I should have stopped.
When stitching the outer layer together,
Fold the zipper as shown and start stitching below the zipper as shown below.
After stitching is complete, trim the tab off to meet edge lining and main fabric.

I like to start at the zipper on both sides for a neat finish.


A long aluminum knitting needle is my favorite turning tool
to poke out corners and smooth out seams.

Tack the opening of the lining closed however you desire.
 Zipper Pull
One more thing left to do.
Add a piece of scrap fabric to your pull to make it a bit easier to grab and zip.

Tie it in a square knot...
Right over left, left over right.


**********************************
Thanks to the FREE programs:
possibly used for this post
GIMP for cropping & other digital effects
Photoscape for downsizing & watermarking photo
PicMonkey creating collages used on this page
Adorable clutch - I love the lining fabric and bow detail. Pinning for later!
ReplyDeleteThis is beautiful, so lucky you can make what ever you need in the color you want it! ~Diane
ReplyDeleteGreat tutorial, very detailed, thanks for stopping by to share on the Oh My Heartsie Girls WW this week. We appreciate your time.
ReplyDeleteKarren
That's a nicely done tutorial, and a darling bag.
ReplyDeleteThis is a great tutorial! I'm so intimidated by sewing but I'll have to give it a try (someday) I've been inspired lately to learn more sewing, thanks for sharing!
ReplyDeleteGreat tutorial! Thanks for linking up with Oh My Heartsie Girl!
ReplyDeleteThis is amazing! Excellent tutorial, and it is such a cute clutch. thanks for sharing at the Oh My Heartsie Girls WW. :)
ReplyDelete~Lorelai
Life With Lorelai
love this! Thank you for sharing at the Thursday Favorite Things blog hop. Watch for your feature on Monday xo P.S. did you see my new giveaways?
ReplyDeleteSo cute! I love it! I would love it if you joined and contribute your awesome posts at my link party at City of Creative Dreams, starts on Fridays at 9AM eastern time :D Hope to see you there at City of Creative Dreams Link Party.
ReplyDeleteWhat a pretty bag, and a really clear tutorial too, thanks for sharing.
ReplyDeleteA wonderful tutorial and lovely to see something a little different :)
ReplyDeleteFantastic tutorial, and I love the lining fabric!
ReplyDeletePenny (Planet Penny)
This is a Wonderful tutorial you have shared. I think I could try and make one for myself. Thank you for the inspiration.
ReplyDeleteIts come together nicely what a lovely gift to receive:)
ReplyDeletePlease come and continue to join in with Handmade Monday, I shall be hosting it on my site from this Sunday but everything else remains the same.
ReplyDeleteI haven't gotten brave enough to try a zipper yet but your tute is pretty easy to follow so I would feel comfy giving it a try! As a bonus I would have this cool clutch as my reward! Thanks for the tute and inspiration!
ReplyDeleteSuch a comprehensive and detailed tutorial, Joy!!! The arrows, etc on your photos make each step very clear.
ReplyDeleteI am confused...in the example above I see brown fabric black fabric, dark grey fabric...I also see a brown zipper and a black zipper...is this one clutch??? I need help please, thanks.
ReplyDeleteHi Barbra, It's all the same purse. The camera soaked in a different amount of light on some pictures. I might see if I can use Photoscape to make the fabric black for you.
DeleteI have now darkened colors where possible without losing details. I must say on my computer and phone, I didn't see brown. I saw a gray where the light affected the black color. I'm wondering how the colors are set on your monitor?
DeleteThank you so much Joy for responding so quickly. I have viewed so many tutorials. I am trying to simply make a zipper pouch or cosmetic bag, with a lining where the raw edges are not seen when you look in the bag. The problem is I love the zipper tabs, such as those you use. I do not like the dents where the side seam and zipper tape meet. I have wasted so much material, zippers and time on this small detail, which really is a big deal to me. Hopefully this will be the answer. I even took a class on how to get rid of those dents, and it didn't really solve the problem. Thanks again.
ReplyDeleteYou are most welcome! Hope this does answer your problem with lining and zipper. I was struggling with the same problem until I came across this application. I came up with this one after studying a bag in a store somewhere & combining some ideas I saw online.
DeleteHello Joy,
ReplyDeleteI tried this technique tonight and it has been the best so far!! I was wondering if you ever do a tutorial making a simple cosmetic bag with the lining and zipper tabs just like this one, can you PLEASE let me know. If you do one, can you do the outer fabric in a lighter color. Also, do you know if any YouTube videos exist out there with this technique? I am so glad I found this tutorial. I really appreciate those red arrows on your diagrams too. Maybe the next time I am in a store, I can take a look at how a zipper bag is done.
Sorry, I haven't published a lined cosmetic bag.
DeleteMy blogging friend Pam over at Threading my Way has a linky that has over 280 links to purse/bag tutorials. http://www.threadingmyway.com/2012/02/threading-your-way-purses-clutches.html
DeleteHi Joy,
ReplyDeleteI was wondering why you attach the lining to the zipper separately from attaching the outer fabric. Most of the tutorials have you to place the outer fabric and lining together and sandwich the zipper in between, but I notice you don't. I was just wondering why, I like to know the mechanics of how things work. I'm excited to hear your response.
It just adds a little more definite accuracy. I like for the edge (after folded over) of the fabric to ride along the zipper evenly. I guess it wouldn't matter on the inside, but I want to be able to tell if I'm stitching the outer fabric in an even line along the zipper teeth. Notice when I stitch first the outer fabric, I use the woven (design) line on the zipper to follow when stitching. When I add the lining, I turn it over to the black side and follow the previous stitch line. If you add both at same time with zipper sandwiched in the middle and follow the edge for stitching, you may not always lay the zipper completely straight resulting in a wavy stitch line on the zipper.
DeleteCan the bag be topstitched on both sides near the zipper to give it a finished look using this technique? If so, at which step would it be done?
ReplyDeleteI would top stitch the zipper after the black pieces are attached and before you add the lining. I didn't top stitch because I felt the side seams would lay flatter. That is also the reason I would not top stitch through the black fabric and the lining at the same time. Sewing the whole purse in one long rectangle makes for a smoother, less bulky side seam at the ends of the zipper.
Delete